

How To Prevent Host App Updater From Automatically Running
If you notice your computer struggling to keep up, you might first turn to the Task Manager to find out what application is causing the high CPU usage. In some cases, you might see that svchost.exe or Service Host Local system is taking up all your CPU power.
Windows Instant Repair Tool

System Information
- Your machine is currently running Windows 10
- This Repair Utility is compatible with your operating system.
Recommended: To repair Windows 10 Errors, use this software package; Restoro System Repair. This repair tool has been proven to identify and fix these errors and other Windows problems with very high efficiency.

- 100% safe as confirmed by Norton.
- Only your system and hardware are evaluated.
What is this process, and more importantly, how do you keep from giving you high CPU usage? In Windows If you are experiencing the Service Host Local using too much processing power, read on to find the answer to your questions and resolve the issue.
What Is Service Host (Svchost.exe)?
Some apps and programs on your computer are called stand-alone executables and can run by themselves. However, many services are DLLs (Dynamic Link Libraries) that don't contain all the information needed to run by themselves.
These DLLs need a Service Host to load and run on your computer. For this reason, you usually have several Service Host processes running when you open your Task Manager.
Service Host helps "host" certain services on your computer. These services are usually designed to run in the background and not cause many problems, but there are some cases where Service Host apps can become corrupt and begin consuming more processing power than they should.
Keep in mind that it is usually one process that Service Host is running and not Service Host itself that is causing the error. That doesn't mean that you can end the service and uninstall it.
Microsoft Windows has many integral services that require the Service Host app to run them. If you end some of these, your computer system will become unstable. The fixes highlighted here works well with Windows 10 however, you can experience this problem with other Windows version too.
Resolve the Service Host (svchost.exe) Processing Error
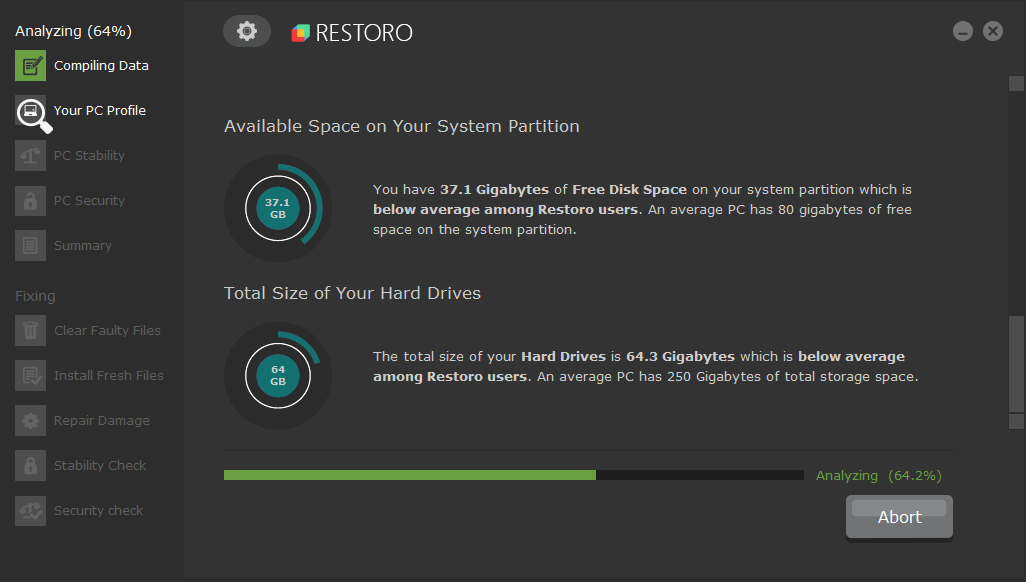
Fix 1: Use the Advanced System Repair Tool (Restoro)
Restoro is a robust program designed to automatically find and repair issues on your PC that might be causing your Service Host Local system issues.
Follow the steps below todownload and install Restoro on your PC.
Please note that you may need to temporarily deactivate your anti-virus to keep it from interfering with utility programs like Restoro.
Step#1
Download and Install the Advanced Repair tool (Restoro) for free.

Step#2
Accept the license terms by checking the "I Accept the EULA and Privacy Policy" to continue.
Step#3
You can view thedetails of the scan by expanding the "Details" tab.

Step#4
To set anaction, expand the "Recommendation" tab to either choose "clean" or "ignore".
Step#5
Click on "Clean Now" at the bottom of the page to begin the repair process.
If you are still having issues after running Restoro, continue to the next method.
Fix #2: Update Your Antivirus and Scan Your Computer
One of the main reasons for a process to consume too much processing power is that your computer has a virus. To make sure that a virus isn't contributing to the Service Host local system processing issue, first, you should update your third party antivirus software.
Since all antivirus software is different, it is difficult to post exact instructions for doing this.
To update the built-in antivirus, Windows Defender, you type "Windows Defender" into the Start menu, select it, and click "Check for Updates Now" when it opens.
When your third party antivirus is up-to-date, you need to run a full system scan then. This scan can take a long time, but it is important to make sure that you do not have a virus interfering with or using the svchost.exe process. Once the scan is complete, have the antivirus remove any viruses it found and restart your computer.
If you are using a third party antivirus, you can visit the manufacturer's website for specific instructions on how to update it. Once you have updated the antivirus, you also need to make sure that Windows Defender is disabled.
Windows 10 should have automatically done that, but you can find out more about disabling it here.
Fix #3: Make Sure Windows 10 Is Up-to-date and Run Update Troubleshooter If Needed
In general, the Service Host will list the name of the program using it. But in some cases, Windows Update can cause a problem with the Service Host Local system process, and you might not see how the two are connected. One reason may be that your computer needs to update.
To see if Windows Update is causing Service Host to get high CPU usage, you should first try to update the computer manually and allow the computer to sit running overnight. This will enable you to see if the issue is resolved and a stalled or missing update finishes.
If you continue seeing svchost consume most of your processing power, Windows 10 has a built-in troubleshooter you can use. Follow these steps to use it.
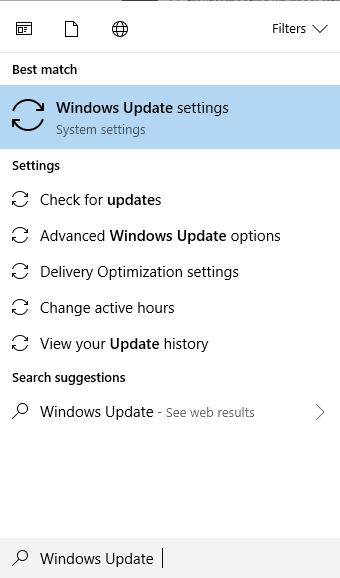
Step #1
Type "Windows Update" into the search bar and open the Windows Update app.
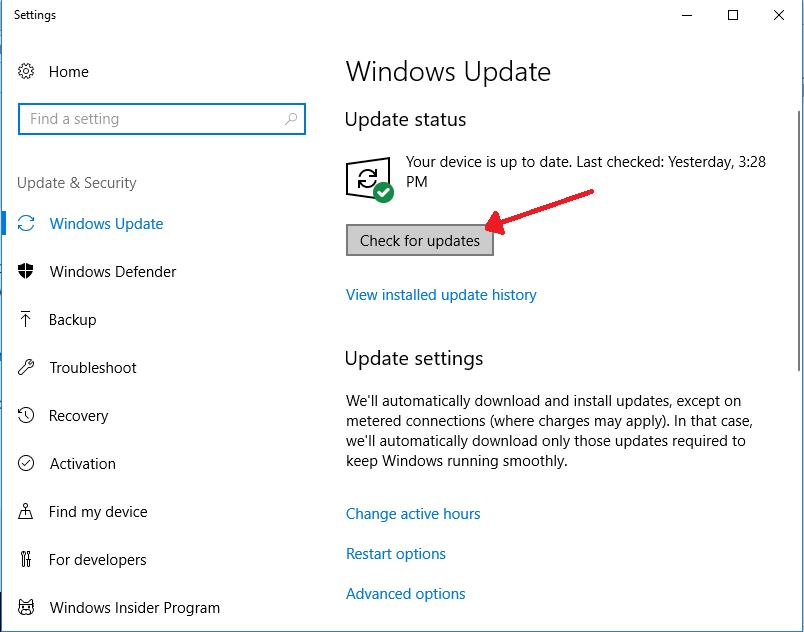
Step #2
Click "Check for updates." This process may take a long time if you have not updated recently. You should install any updates that are missing.
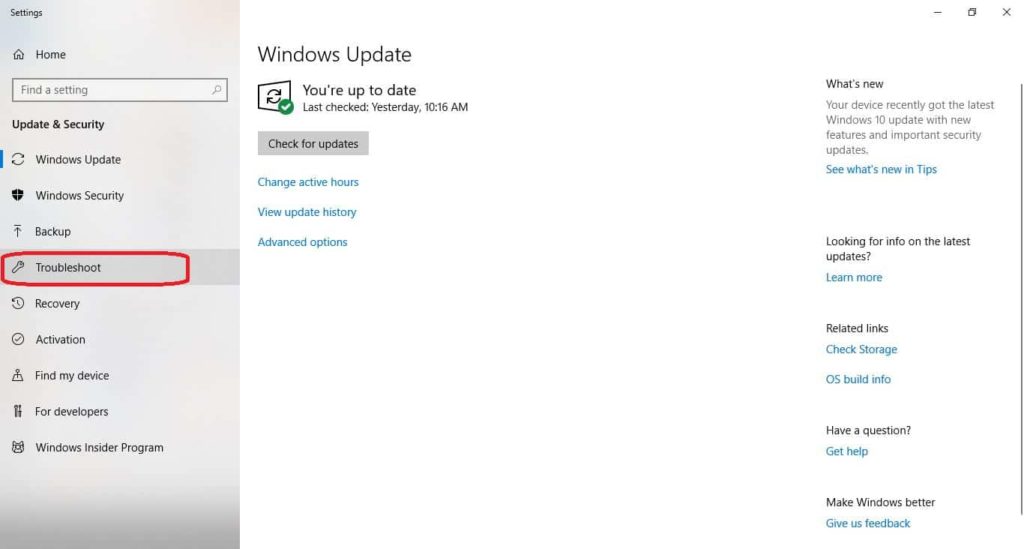
Step #3
If after performing a manual update and allowing your computer to sit overnight, go back to Windows update and click "Troubleshoot" on the left column menu.
Step #4
Now, click "Windows Update" in the center area of the window. Then click "Run the troubleshooter" when it appears directly beneath it.
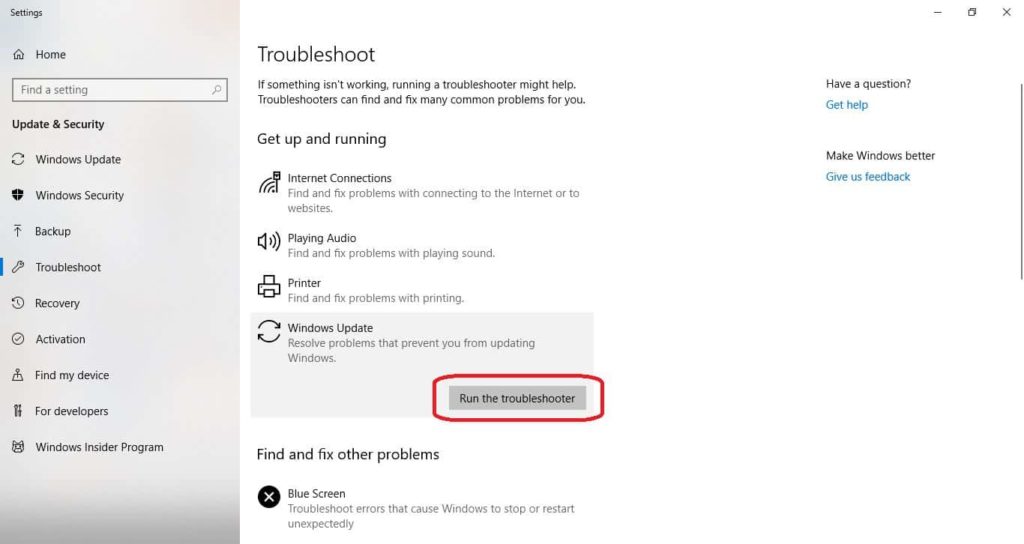
Step #5
The Windows Update will begin checking for problems. Follow the onscreen prompts to repair them.
The abbreviation for Windows Update is wuauserv. If the troubleshooter does not resolve the issue and you still believe Windows Update is freezing up your system and causing the svchost.exe processing error, you can find more information to fix the problem here.
If the Service Host local system continues to have high CPU usage, it may not be Windows Update. Continue to the next method.
Fix 4: Run the System File Checker and Repair the Windows Image
In some cases, a corrupt Windows file might be causing the problem. The system file checker app is designed to repair corrupted files on your computer that are causing an error to happen. The steps below will help you access the system file checker through PowerShell.
Step #1
Press the [X] and the [Windows] keys together on your keyboard. Choose "Windows PowerShell (Admin)" on the menu that appears and choose "Yes" if the system asks if you want to allow that app to make changes.

Step #2
In the PowerShell window that opens, type "sfc /scannow" (without the quotation marks) into it and press [Enter]. Wait until the process is done. It may take some time to complete.

Step #3
After the scan finished, type "Repair-WindowsImage -RestoreHealth" (without the quotation marks) into the new prompt or copy and paste the command there. Press [Enter] when you are done. Again, it may take some time for the repair to finish.

Step #4
After the scan finishes, you must restart your computer. Open the Start menu, click the Power icon, and choose "Restart."

If you still see Service Host consuming most of your computer performance, continue to the next method.
Fix #5: Empty the Event Viewer Log
If you have a large file of event logs in your event viewer, it can cause high Service Host Local system processing problems. Following these steps will clear your log:
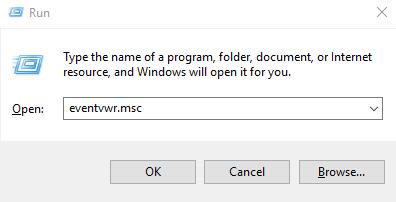
Step #1
Press [R] and the [Windows] key simultaneously. Enter 'eventvwr.msc' into the Run box that appears. Click 'OK' to open the Event Viewer.
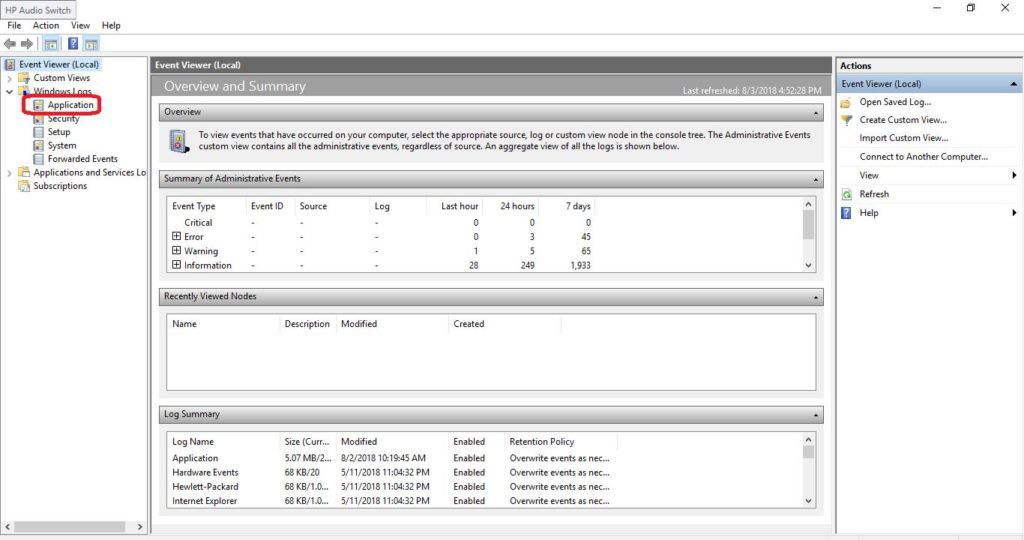
Step #2
Click "Windows Logs" from the menu on the left side of the window that opens. Choose the "Application" option from the drop-down menu that appears.
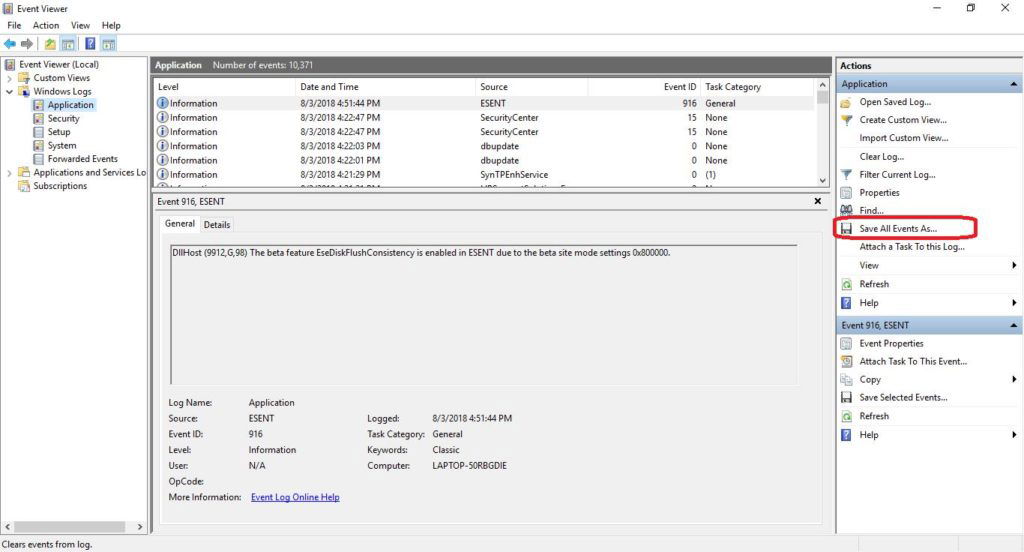
Step #3
Now choose "Save Events As" on the right side of the screen. I recommend giving the save file a date name and type of log. For example, "6Nov2010 Application."
By default, it will save the event log as an event file, but you should also save it as a text file or spreadsheet file in case you need the information in a readily viewable form later.
Step #4
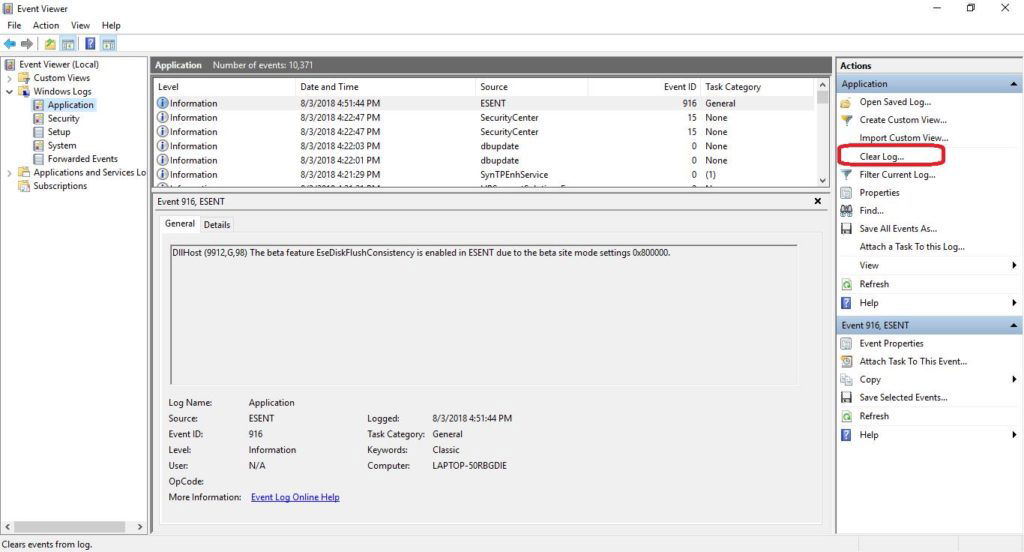
Once the log is saved, choose "Clear log," which is also on the right side of the screen.
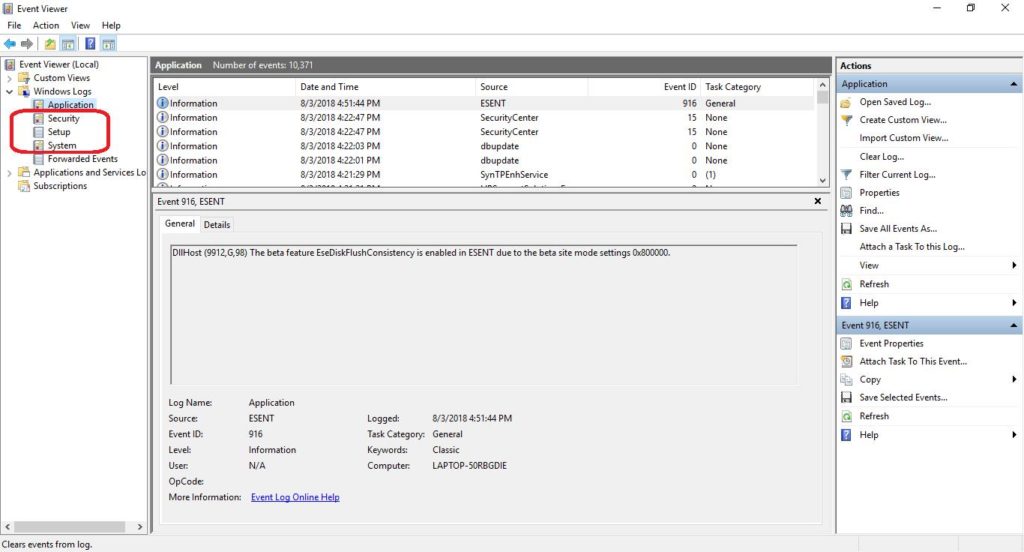
Step #5
Now, repeat steps #3 and #4 after clicking first on "Security," and then after clicking on "Setup" and finally after clicking on "System." Be sure to name each saved log differently.
Step #6
Once you finish clearing the logs, you must restart your computer. As before, open the Start menu, click the Power icon, and choose "Restart."
Fix #6: Uninstall Unused Apps
The more apps you have on your computer, the more likely they are going to be running in the background and performing updates or maintenance tasks that can use or interfere with the Service Host Local system. These issues might also cause high CPU usage.
Make sure you back up your computer or create a restore point before performing this method in case you accidentally remove a program you need. You can learn how to create a system restore point here.
Step #1
Type "control panel" into the Start menu and select that option.

Step #2
Click on "Uninstall a program."

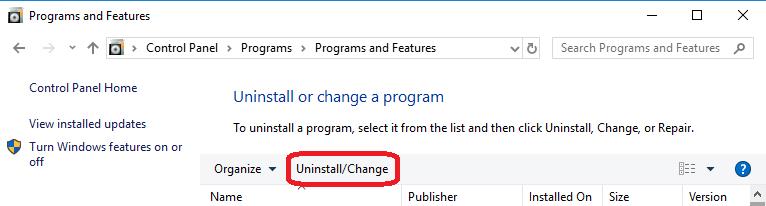
Step #3
Scroll through the list of programs. Uninstall those you do not use by clicking on the program and then clicking the "Uninstall" button at the top of the list.
You will need to restart your computer and then check the Task Manager to see if the problem is resolved.
Fix #7: Run Check Disk in the Command Prompt
Corrupt files are the key reason behind many incidences where an app or service is consuming too much CPU power in Windows 10. You can check your computer disk drives for errors by following these steps:
Step #1
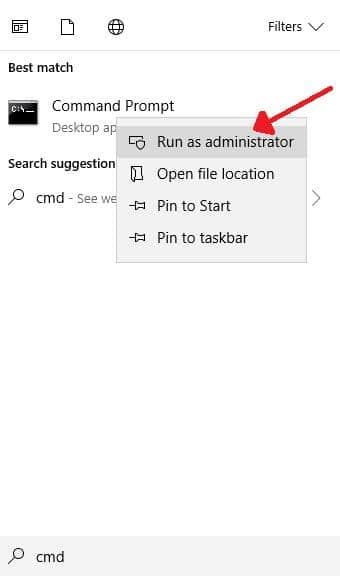
Type "Command Prompt" into the Start menu. Right-click on the "Command Prompt" option and choose "Run as administrator" from the drop-down menu. Click "Yes" to give the program permission to make changes and continue to the Command Prompt.
Step #2
At the prompt, enter "chkdsk c: /r" without quotation marks. Keep in mind that c: is the name of the drive you wish to check, so you might have to replace that letter with a different letter.
Now press 'Enter."
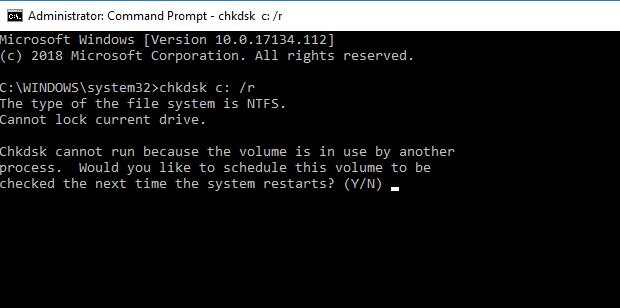
Step #3
The system will prompt you to restart the system. Choose Y to reboot now and then press [Enter]. This process can take some time, especially if it is the first time you have done it. However, Windows should automatically repair any errors it finds.
Fix #8: Disable the BITS Service
The BITS (Background Intelligent Transfer Service) uses idle bandwidth to perform a variety of background downloads that Windows 10 needs (such as Updates).
Occasionally, this service becomes corrupt and begins consuming excessive bandwidth, which then affects the amount of RAM that the svchost.exe process uses. In this case, you should disable the BITS service to fix the problem.
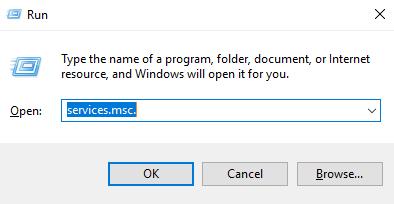
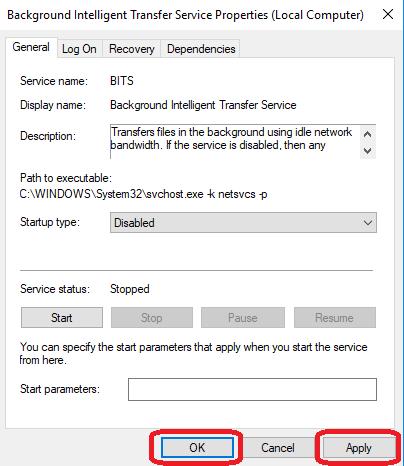
Step #1
Press [R] and the [Windows] key simultaneously. Enter 'services.msc' into the Run box that appears. Click 'OK' to open the Services window.
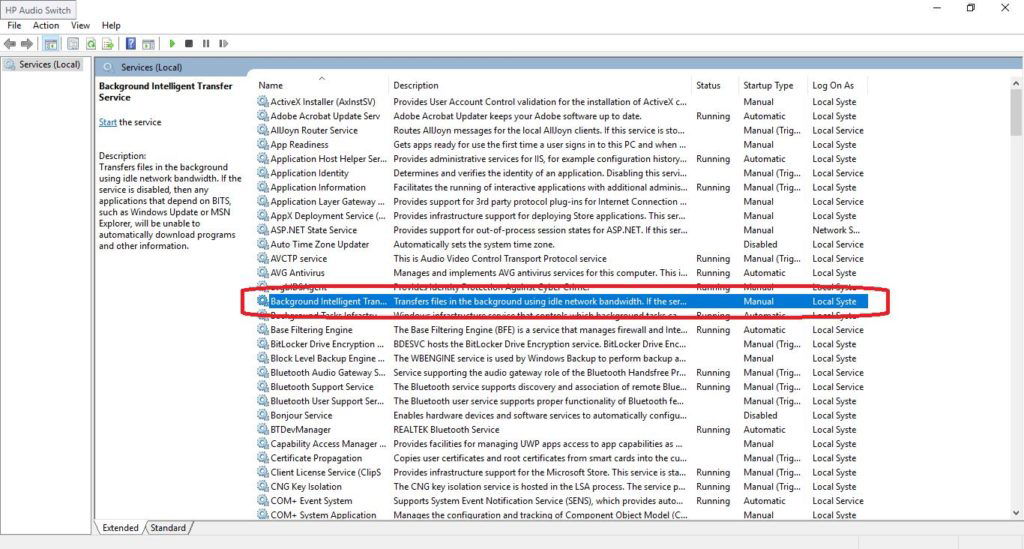
Step #2
Scroll through the services until you find Background Intelligent Transfer Service. Double-click on the service.
Step #3
In the window that appears, open the drop-down menu next to "Startup type." Then click "Disabled."
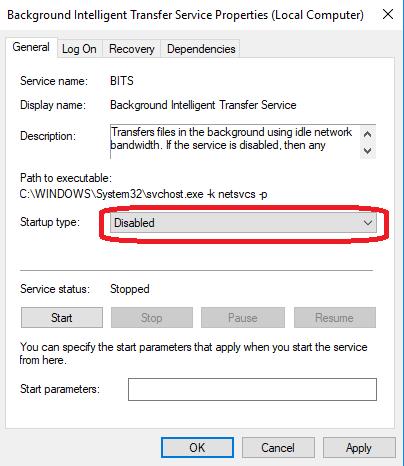
Step #4
Now, click "Apply" and then "OK." Once you restart your computer, your Service Host CPU usage should return to normal. If not, repeat the steps above to enable the BITS process to run automatically, clicking "Start" before you click "OK" and "Apply," and continue to the next method.

Fix #9: Disable the Windows Update Service
Disabling the troublesome Windows Update service may be one of the easiest methods of preventing Service Host from consuming all your high CPU usage, but it should not be done lightly.
Although some processes run in the background and are unnecessary, many of the Service Host processes are important. Follow these steps to disable the troublesome service.
Step #1
Right-click on the Task Bar at the bottom of your screen and select "Task Manager" from the menu that appears.

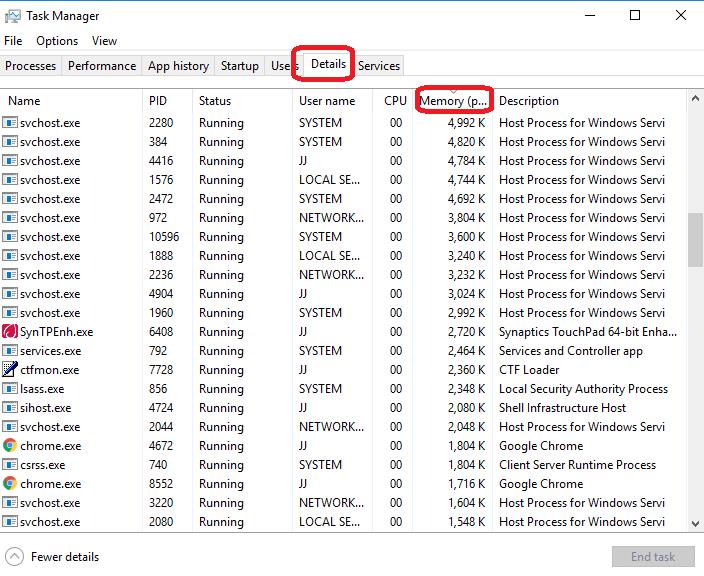
Step #2
Now, click on the "Details" tab. Then click "Memory" once to sort the running processes by memory consumption.
Step #3
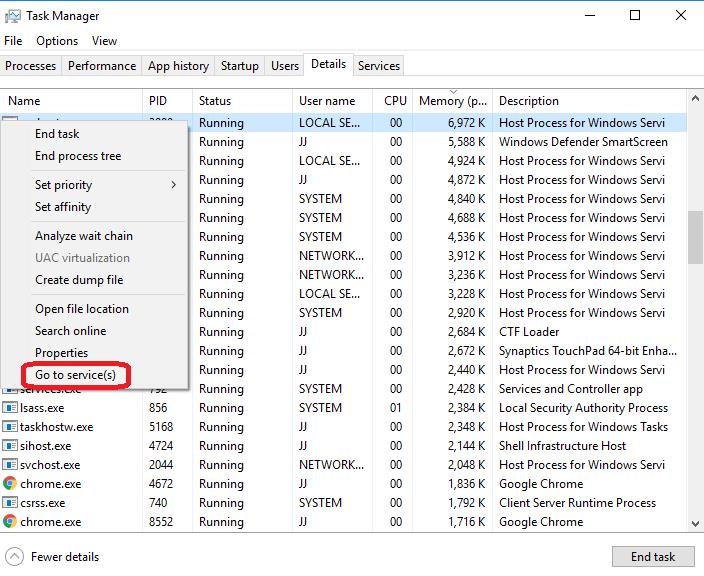
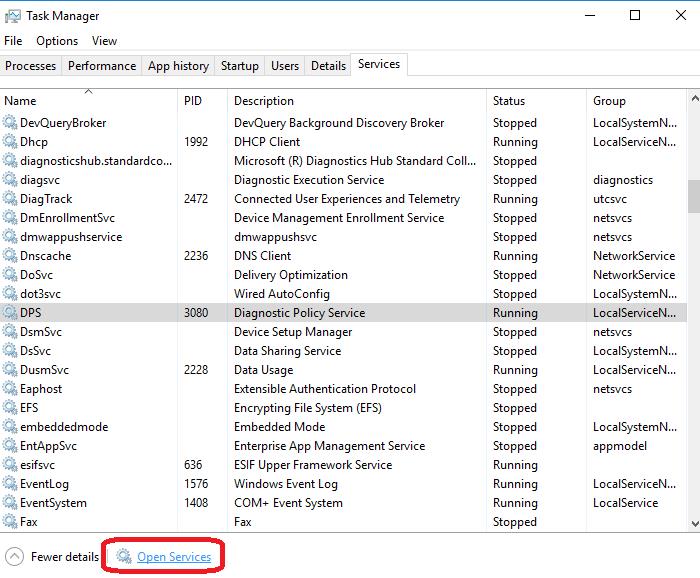
Right-click the svchost.exe process that is using the most CPU power. This should be the one closest to the top of the list now. Choose the "Go to service(s)" option.
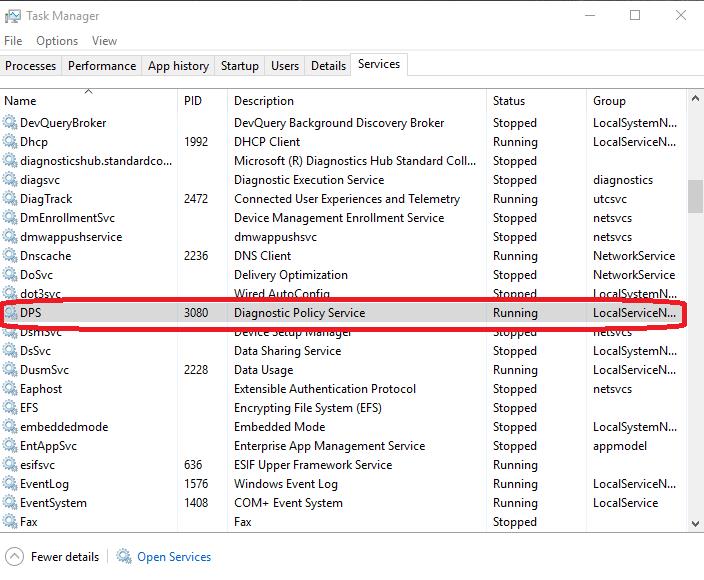
Step #4
This will take you to the services tab, where you will see one or more services highlighted. For example, you can see the Diagnostic Policy Service is highlighted in the image. We are just using this as an example. Your highlighted services will probably be different.
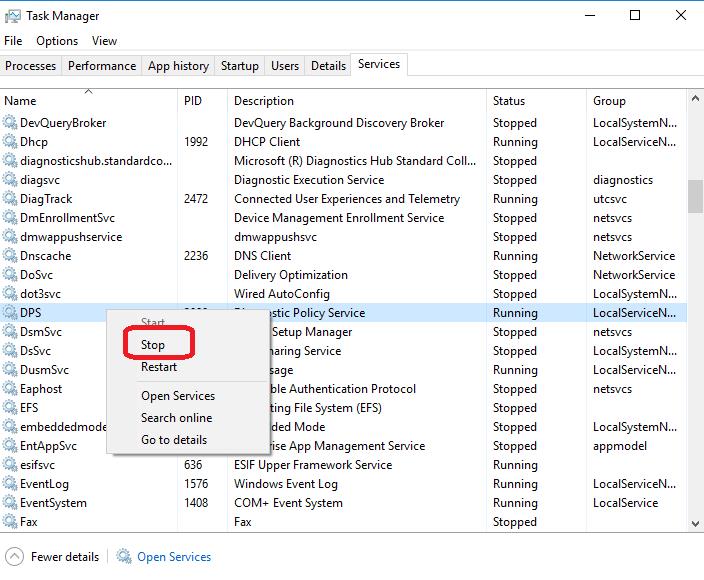
Step #5
Right-click the highlighted service and choose "Stop." You should check to see if the Service Host process has returned to normal. Repeat this step if more than one service is highlighted, checking each time to see if the process you stop fixes the svchost.exe memory consumption problem.
Step #6
When you find the service causing the problem (the one that allows the svchost.exe memory usage to return to normal once you have stopped it), then click the "Open Services" button at the bottom of the window.
Step #7
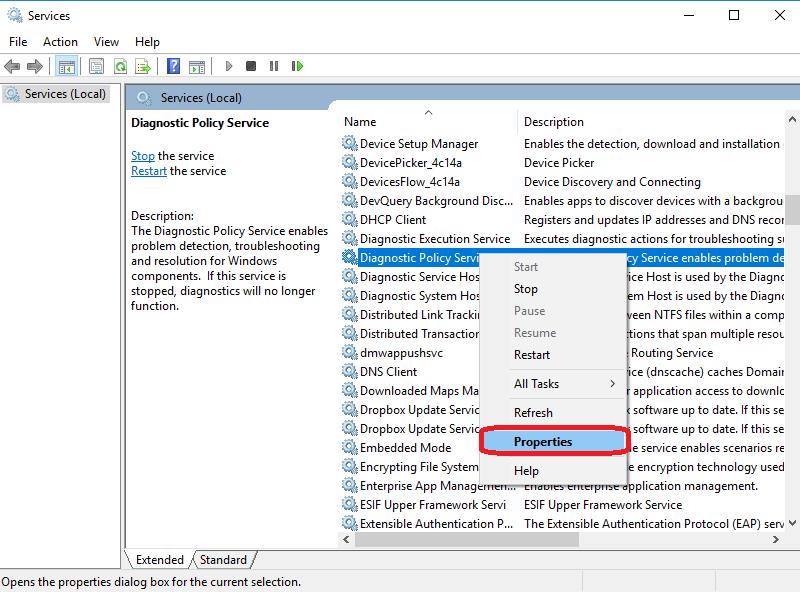
The services window will open. Scroll down until you find the name of the service that was causing the problem. Again, we are using the Diagnostic Policy Service as an example in the image.
The service causing your problem will probably be different. Right-click the name of the service, and choose "Properties."
Step #8
As in the previous method, when the window that appears, open the drop-down menu next to "Startup type." Then click "Disabled."
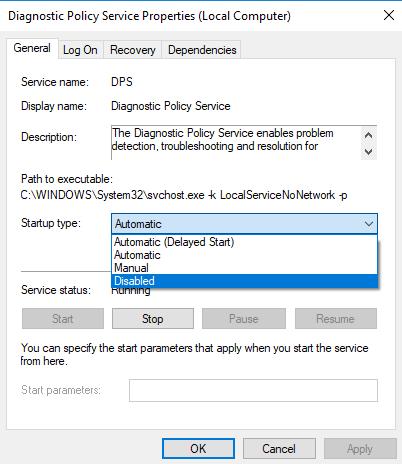
Step #4
Now, click "Apply" and then "OK." Once you restart your computer, your Service Host CPU usage should return to normal. If not, repeat the steps above to return the service to "Automatic," clicking "Start" before you click "OK" and "Apply," and continue to the next method., and continue to the next method.
Fix #10: Update Drivers
This method can take a lot of time. Because of this, you should first update any drivers for graphics, video, and the processor. Be sure to check if updating these resolves the issue before you continue to update the rest of your drivers.
Keep in mind that you should perform a system backup before you try this method.
Step #1
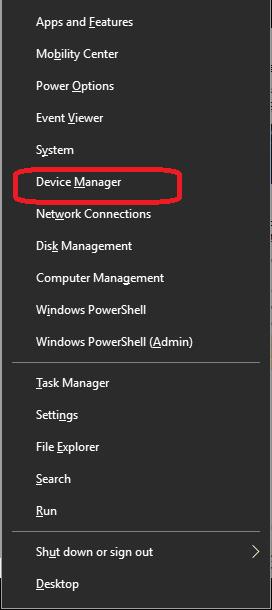
Press the [X] key and the [Windows] key together on your keyboard. This opens the Quick Link menu where you need to choose "Device Manager."
Step #2
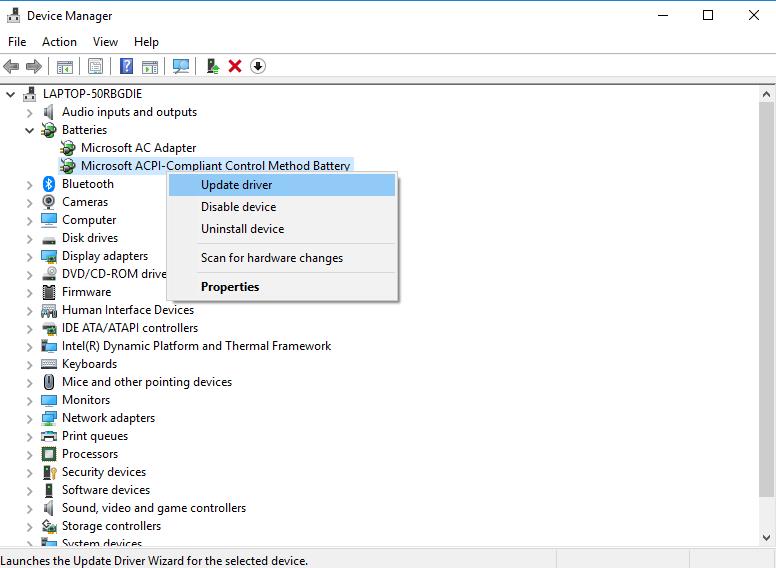
Click the first device category to expand it. Then, right-click on the name of the first device listed for that category and click "Properties."
Step #3
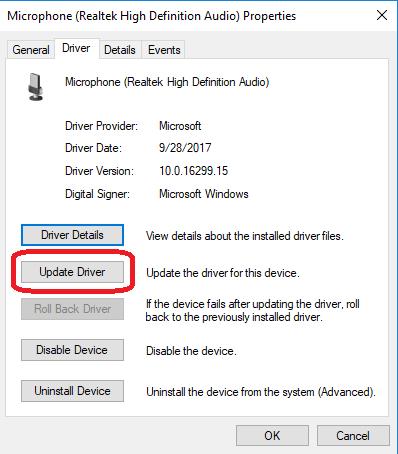
In the driver tab, choose "Update Driver."
Step #4
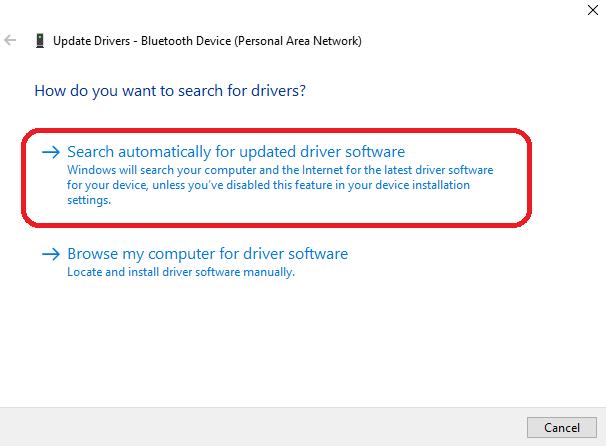
When you click Update Driver, you will see an option to have the computer automatically search for driver software. Choose this option. The computer should perform an automatic search.
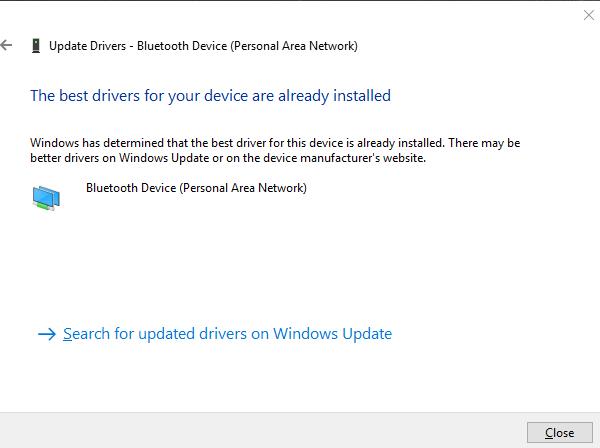
If your driver is up-to-date, you will see a message stating you already have the best driver installed for that device. Otherwise, the computer should automatically update the driver.
Continue to the next step. If you prefer to do this update check manually, you can make a note of the driver version you currently have and check on the device manufacturer's website for the latest version.
If you do not have the latest version, you can download it and install it manually from the manufacturer's website.
Step #5
Close the pop-up window once the search (and update if needed) is finished. Return to the device manager window (and Step #2) and follow the instructions for the next device(Steps #2- #4) until you have checked for driver updates on all the types of devices and device drivers that are listed.
Step #6
Once you have checked for updates for every driver on the list, restart your computer.
Again, check if there is still high CPU usage. Continue reading if you still haven't resolved the error.
Fix #11: Disable Automatic Updates
Sometimes automatic updates might be using up all your resources. By changing the settings of your Windows update service, you can fix this problem in no time.
Step #1
Type "services" in the Search bar, then click Open. You need to navigate and double click the Windows update service.
Step #2
Go to the General tab, find Startup type, then select Disabled. Click Apply, then OK. Go back to Task manager, then end the Service Host: Local System task.
Fixing your Windows update service settings did not fix the issue, go to the next fix.
Fix #12: Restart Windows Update Service
If the fixes above still did not work, you can try to restart Windows Update Service. Your Windows Update Service is the one in charge of helping your PC with automatic updates. Whenever Windows Update service is down, you will soon or later meet some issues.
Run command prompt using admin access and type the following commands (hitting enter after each command)
net stop bits
net stop wuauserv
net stop appidsvc
net stop cryptsvc
ren %systemroot%\SoftwareDistribution SoftwareDistribution.bak
ren %systemroot%\system32\catroot2 catroot2.bak
net start wuauserv
net start bits
net start appidsvc
net start cryptsvc
These should kickstart your Windows Update Service immediately and you can expect it to work for your PC.
Fix #13: Fix Memory Leak
A memory leak within the non-paged memory pool can cause problems with your service host update. You can fix a memory leak issue with these simple changes in the registry.
Step #1
In the Search bar, type "regedit" then click Open.
Step #2
Navigate to the following location: HKEY_LOCAL_MACHINE > SYSTEM > ControlSet001 > Services > Ndu. Next, Right-click the Start value and then choose Modify. You need to change the Value data to 4. This will disable the service. Click on OK.Close the Registry Editor and restart your computer.
Step #3
Once your PC restarts the memory leak should have been fixed. Furthermore, the CPU or Disk usage of the System Host: Local System (Network Restricted) should be greatly reduced.
Fix #14: Do a Clean Boot
If a third-party app is causing the Service Host memory usage issue, restarting the computer without these apps running should fix the issue. When you do a clean boot, it reboots the computer with only the necessary Microsoft services apps running.
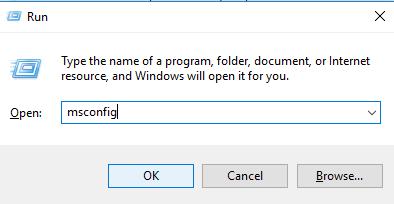
Step #1
Press the [R] key and the [Windows] key together on your administrator account. Type "msconfig" in the box without quotation marks, and click "OK."
Step #2
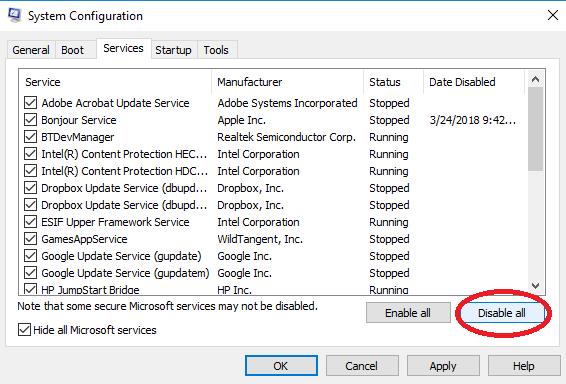
In the System Configuration window, click the "Services" tab. Make sure that "Hide all Microsoft services" has a checkmark next to it. Click the button to "Disable all."
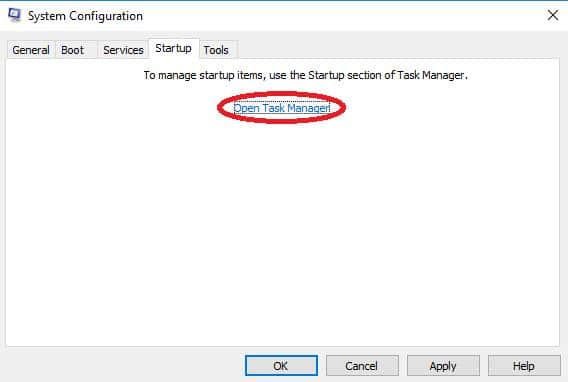
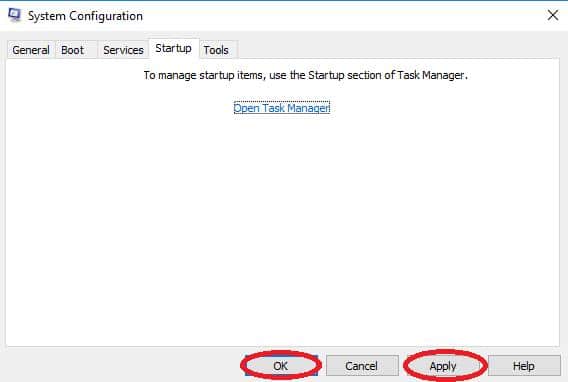
Step #3
Now, click the "Startup" tab in the System Configuration window. Then click "Open Task Manager."
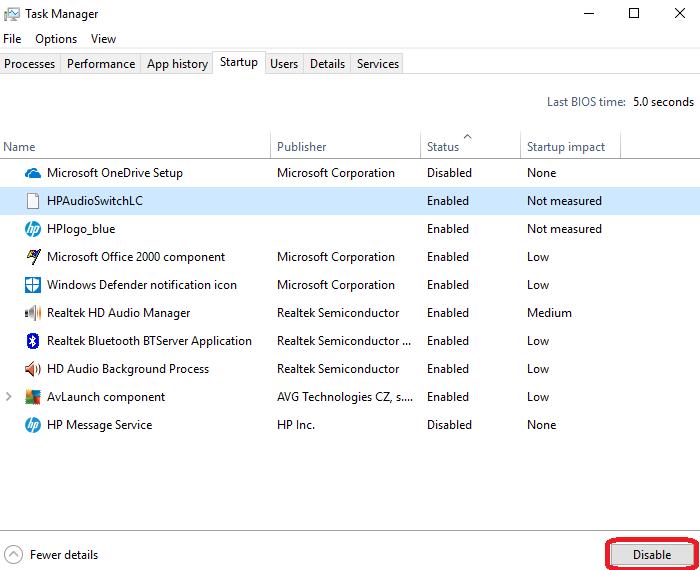
Step #4
When the Task Manager opens, click the "Startup" tab if it isn't already open. Select each item you find there and click the button to "Disable" it if it isn't already disabled. When you are finished, close the Task Manager.
Step #5
You should be back in the System Configuration window that is still open, click the "Apply" button and then "OK."
Step #6
Now you need to restart your computer. Click on the Power icon found on the Start menu and choose "Restart."
Step #7
Once the computer restarts, check the Task Manager to see if the problem is resolved. If it is, repeat the entire process above, slowly adding in other apps one-at-a-time by clicking the box next to them to see which one is causing the problem.
Since more than one app may be interfering with the Service Host, you will need to disable any that do to return your processing power to normal.
If you have tried all the methods above and are still having problems, you can check out the blog post on How to Rectify the 100% Disk Usage Error on a Windows 10 Computer for more ideas.
How To Prevent Host App Updater From Automatically Running
Source: https://techloris.com/svchost-exe-high-cpu/
Posted by: wellshasurseen.blogspot.com
0 Response to "How To Prevent Host App Updater From Automatically Running"
Post a Comment